Escher Verification Studio User Guide
Version 7.0, February 2017
Disclaimer
The information in this publication is given in good faith but may contain errors and omissions. The contents of this document and the specifications of Escher Verification Studio are subject to change without notice. Where third-party products are mentioned, no endorsement of those products is implied.
Contents
2.1 Source code editor
2.2 Source code control system with project build facilities
2.3 C++ compiler
2.4 Java SDK
2.5 C# compiler
3. Using Escher Verification Studio
3.1 Overview of Verification Studio projects
3.2 Adding and removing files from a project
3.3 Using the context sensitive right-click files menu
3.4 Changing project settings
3.5 Using multiple configurations
3.6 Building and verifying a project
3.7 Error output
3.8 Importing UML class diagrams
3.9 Changing Verification Studio global settings
4. Building a console application with Perfect Developer
4.1 Main program
4.2 Compiling and linking the generated code
4.3 Runtime checks
6.1 General
6.2 Environment variables
6.3 Form of command line options
6.4 Error reporting options
6.5 Code generation options
6.6 Source language options
6.7 Source file options
6.8 Verification options
6.9 Cross-reference options
6.10 Miscellaneous options
8.1 Verification Studio program file
8.2 Library and run-time files for Perfect Developer
8.3 Standard header files for Escher C Verifier
8.4 Examples
8.5 Editor customizations
Introduction
What is Escher Verification Studio?
Escher Verification Studio provides tools for developing software that it mathematically proven to meet precise specifications. It is used in conjunction with traditional development tools such as text editors, compilers and source code control systems.
Currently, there are two verification tools within Escher Verification Studio:
- Perfect Developer (PD) is a model-based tool for developing precise specifications, refining them to efficient implementations and data structures, and generating ready-to-compile code in a choice of programming languages. Use it to model critical systems and software, generate prototype software, and (where suitable) generate code for the final system. Perfect Developer supports both modular and object-oriented development, and can import class diagrams from some popular UML tools.
- Escher C Verifier (eCv) is a tool for developing handwritten software in annotated MISRA-C (optionally with a some C++ constructs) that it proven to meet specifications. Use it to develop critical embedded software where the desired programming language is C and handwritten code is preferred for performance or other reasons.
The principles
By expressing user requirements and system specification in a high-level description language called Perfect, the Perfect Developer tool is able to use automated reasoning technology to understand the descriptions and to verify that your requirements will be met. Perfect Developer will generate most of the code directly from the specification, facilitating the rapid construction of a fully-functional prototype. This prototype can then be evaluated to ensure that requirements have been correctly captured. Typically, only a fraction of the prototype specification will have to be refined to obtain the performance required of the final product; and Perfect Developer will verify that the refinements are sound.
Where a developer wishes to write C code by hand, it can be annotated with function contracts and other specifications using the Verified Design by Contract paradigm, and then verified by Escher C Verifier.
Both tools use a powerful automatic inference engine and theorem prover to reason about the requirements, specifications, and code. It is not necessary for developers to have advanced mathematical knowledge.
Publications available
The intention of this User Guide is to provide guidance on the operation of the Project Manager component of Escher Verification Studio. Whether you are using Perfect Developer or Escher C Verifier, the Project Manager is used to organize source files into projects, specify configuration settings, and launch the verification tool.
For an outline of the Perfect language itself, please refer to Getting Started with Perfect. The full definition of Perfect is available in the Perfect Developer Language Reference Manual.
To learn how to adapt the way you write C programs so that they can be processed by Escher C Verifier, see the Escher C Verifier Manual.
1. Summary
1.1 Overview
Escher Verification Studio from Escher Technologies Limited provides tools for developing high-integrity software that is mathematically proven to meet functional specifications. It is intended to be used in conjunction with a third-party compiler (a C or C++ compiler when using Escher C Verifier, and a C++, Java or C# compiler when using Perfect Developer). It runs on industry-standard PC hardware under both Linux and Windows, including Windows XP, Windows Vista and Windows 7.
1.2 Hardware
The recommended hardware is a PC to the following minimum specification:
- Intel or AMD x86 or compatible processor at 1GHz or higher clock speed
- 2Gb or more RAM
- At least 100Mb free hard disk space
Verification of large projects requires additional memory. Error-correcting memory is recommended if Escher Verification Studio is used to generate or verify critical software.
1.3 Source and Output Files
Source files may be prepared with the built-in text editor or with a third-party text editor (see section 2 on Compatible Tools).
The source language recognized by Perfect Developer is defined in the Perfect Developer Language Reference Manual from Escher Technologies Limited. The code generator can generate output in C++, C# 2.0 and Java. The C++ language is defined in international standard ISO/IEC 14882-1998 (title: Information Technology - Programming Languages - C++). The C# language is defined in international standard ISO/IEC 23270:2006 (title: Information Technology - Programming Languages - C#). The Java language is defined in the Java Language Specification (Second Edition) from Oracle Inc.
The source languages recognized by Escher C Verifier are subsets of C'90, C'99 and C++'98 defined in the Escher C Verifier Manual.
2. Compatible tools
The following is for guidance only. Escher Technologies accepts no responsibility for the performance of third-party products.
2.1 Source code editor
Escher Verification Studio has a built-in source code editor. You can choose to use an external editor if you prefer.
When using a third-party editor with Perfect Developer source files, the source code editor should have provision for displaying and printing Perfect source code with syntax highlighting. For this purpose, customization files for some popular Windows and Linux editors are provided with Escher Verification Studio. When used with source files to be processed with eCv, the source code editor should have provision for syntax highlighting C/C++ including the additional eCv keywords. Most modern source code editors have configurable syntax highlighting.
2.2 Source code control system
The facilities required of the source code control system will
depend on user requirements. The current release of Escher
Verification Studio does not provide integration with source code
control systems.
2.3 C++ compiler
When generating C++ code from Perfect source files, an ISO-compatible C++ compiler for the target machine is required. The following compilers have been successfully used with large Perfect Developer projects:
- Microsoft Visual C++ 2005 (including Express Edition)
- Microsoft Visual C++ 2008 (including Express Edition)
- Microsoft Visual C++ 2010 (including Express Edition)
- GNU gcc version 4.3
When compiling C++ code produced by Perfect Developer, ensure that your compiler is configured to the following settings:
- Strict ISO compatibility (i.e. disable non-ISO extensions)
- Enable exception processing
- Enable run-time type information
- The directory containing the file Ertsys.hpp must be included in the compiler search path for include files
Further information on C++ compiler compatibility may be found via the Support page of the Escher Technologies web site.
2.4 Java SDK
When generating Java code from Perfect source files, the Java 6 SE SDK (or later) is required to compile the resulting files. This can be downloaded from Oracle Inc.
2.5 C# compiler
When generating C# code from Perfect source files, a C# compiler for version 2.0 (or later) of the C# language is required, together with a .NET 2.0 (or later) compatible framework library. The following compilers have been used successfully to build large Perfect Developer projects:
- Microsoft Visual C# 2005 (including Express Edition)
- Microsoft Visual C# 2008 (including Express Edition)
- Microsoft Visual C# 2010 (including Express Edition)
3. Using Escher Verification Studio
The simplest way to use Escher Verification Studio is via the Project Manager. To start the Project Manager under Windows, go to the Start menu and select the Escher Verification Studio item from the Programs -> Escher Verification Studio menu. Under Linux, the Project Manager can be started by executing the file /opt/escher/bin/verificationstudio.
When started, the application will appear as shown below (the Project Manager is shown here running under Windows; under Linux the appearance will be different, but the functionality is identical):
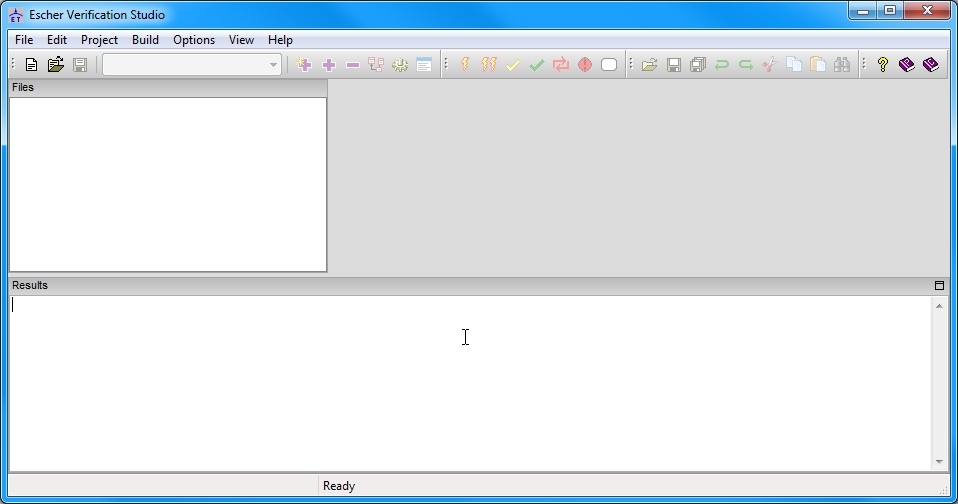
The most important parts of the application window are the files pane and the results pane.
The files pane displays the full paths to the files that are contained in the current project.
The results pane is used to capture the output from the tool which is invoked in response to the user selecting one of the Build, or Check items from the Project menu. Following a failed build or verify operation, some lines in the results pane will normally contain error messages generated by the tool. Double-clicking on such lines causes the offending source file to be opened, with the cursor placed at the location given in the error message.
The tool bars provide instant access to the most important commands from the menu.
You can change the layout by dragging the files pane, the results pane and the tool bars away from their usual positions. You can leave them floating, or you can dock them at other positions.3.1 Overview of Escher Verification Studio projects
The Project Manager allows you to create 'projects' that contain a record of all the source files for an application, and the tool settings that will be used when you wish to compile, verify or generate a cross-reference listing for the project. Escher Verification Studio project menu options appear on the File menu, as detailed below:
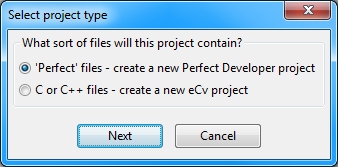
New project...
If you are licensed to use both Perfect Developer and Escher C Verifier, you will be asked whether you wish to create a Perfect Developer project (containing Perfect source files), or an Escher C Verifier project (containing C or C++ files):
You will then be prompted for the name and location of a new Escher Verification Studio project file, and the project will be created with an empty file list and some default tool settings. See section 3.4 for details about how to change the project settings.
Open project...
This item prompts you for the name and location of an existing Escher Verification Studio or Perfect Developer project file, and opens it in the application.
Save project
This item prompts you to save the currently-open project to its existing name. Note that the Save project item is only available if the project has actually been changed, i.e. if files have been added or removed or if project settings (as distinct from application settings, under the Options menu) have been altered.
Save project as...
This item saves the currently-open project to a new name, prompting you for the new name.
Open file
This item allows you to open a text file in the editor, which is visible as a tab in the editor pane. The current line in the current tab in the editor pane is highlighted in yellow. Files that are part of the project can be opened easily by double-clicking on their names in the files pane.
Save file
This item allows you to save the file that is open in the current tab of the editor window.
Save file as...
This item allows you to save the file that is open in the current tab of the editor window, but under a different name.
Save copy as...
This item allows you to save a copy of the file that is open in the current tab of the editor window, under a different name.
Close file
This item closes the file in the current tab of the editor window.
Exit
This item quits the application. It prompts you to save any un-saved files that are open in the editor, and also the current project if that has been changed since it was last saved or opened.
3.2 Adding and removing files from a project
Once a project is open, existing Perfect or C/C++ source files (depending on project type) may be added, new source files created, and unneeded files removed as required, using either the toolbar buttons provided or the corresponding items in the Project menu. When creating a new file, the following dialog is displayed, allowing you to choose whether to create skeleton code and/or open the file for editing:
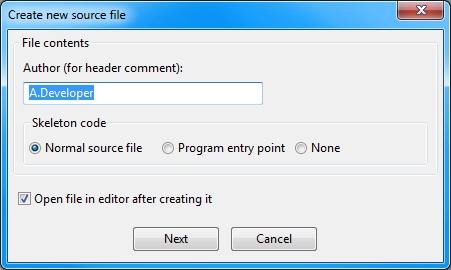
When creating a new file, a file name, directory and author name must be provided. If the Create with skeleton code option is checked, the file will be generated with a generic class skeleton. Alternatively, by selecting Program entry point, a file will be created containing a function or schema with the correct signature for the entry point into the C/C++ or Perfect code.
If the Automatically open option is checked, the file will be opened for editing upon pressing OK.
3.3 Using the context-sensitive right-click files menu
It is often convenient to be able to perform operations upon a chosen set of source files. Escher Verification Studio provides a mechanism for doing this, via the context-sensitive files menu, activated by right-clicking on a file selection in the files list. The selection is made using the mouse left-click (multiple files may be selected by using the 'Control' or 'Shift' keys, as is usual with Windows applications). The image below shows the right-click menu in action:
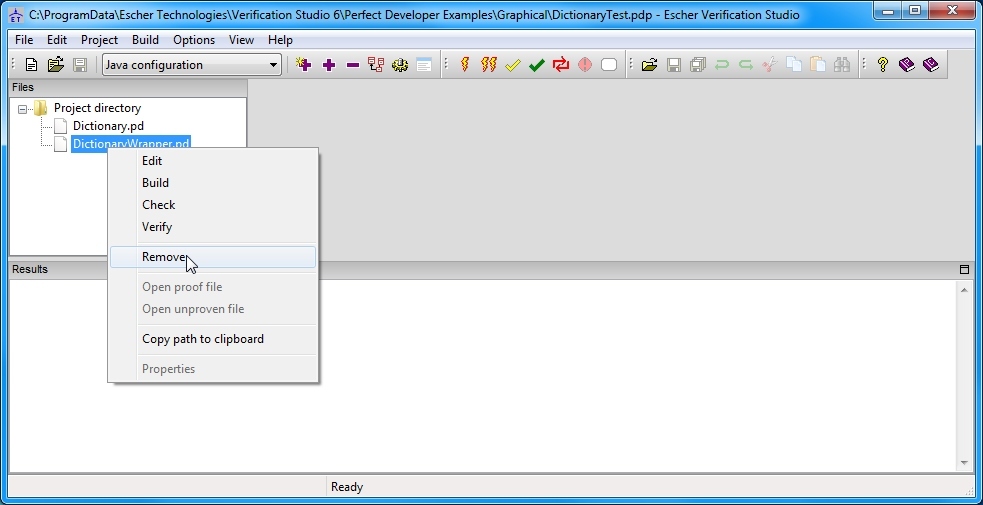
The functionality provided by the items on the right-click menu are described below (note that the Open proof file and Open unproven file items are only available when a single file has been selected):
Edit
This feature allows a selection of files to be opened in the currently-configured editor.
Build
This feature is available only when the current project is a Perfect Developer project. It causes code to be generated for the currently-selected source files. Note that the files will be built unconditionally, i.e. no check will be made to see whether they actually require building.
Check
This feature causes the selected source file(s) to be processed. Checks for syntactic and semantic errors are made, but verification is not performed and no code is generated.
Verify
This feature provides a way to verify only selected source
files, instead of verifying the entire project.
Remove
This feature allows a selection of files to be removed from a Perfect Developer project. This is an alternative to removing files using the mechanism described in the section 3.2 Adding and removing files from a project.
Open proof file
This item provides a quick mechanism for accessing proof output files generated by the verifier. The project settings provide ways to specify where proof output files are generated and what their names are. Selecting this menu item automatically determines the name and location of the generated proof file associated with the source file selected, and opens it in an appropriate external viewer. Note that this viewer is not the configured editor. It may be a web browser (for HTML format proof files), a text editor, or a TeX viewer. Note also that if the project settings are configured such that separate proof output files are not being generated, this menu item will not be available (it will be grayed out).
Open unproven file
This item uses the same logic as the Open proof file item described above, but applies to unproven output files instead of proof output files.
Copy path to clipboard
This copies the full file path to the clipboard.
Properties
This item is not currently implemented.
3.4 Changing project settings
The current settings for a project may be viewed or changed by selecting the Settings item from the Project menu, or by clicking on the Settings tool button as shown below:
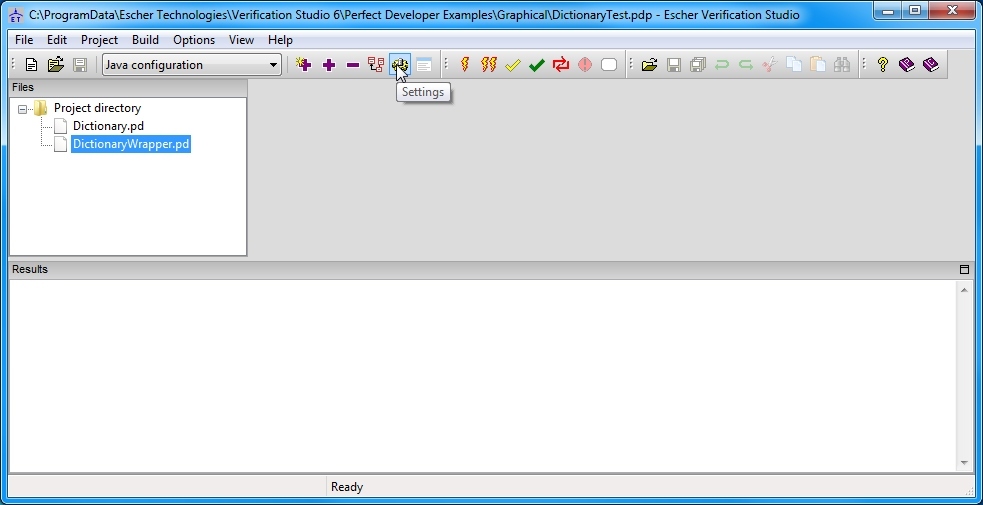
Either of these actions opens a window with a tabbed document interface. Some tabs are relevant only to Escher C Verifier projects; likewise some tabs are relevant only to Perfect Developer projects. Only relevant tabs are shown.
Error reporting
This tab always appears. It lets you determine how errors, warnings and information messages are reported, as illustrated here:
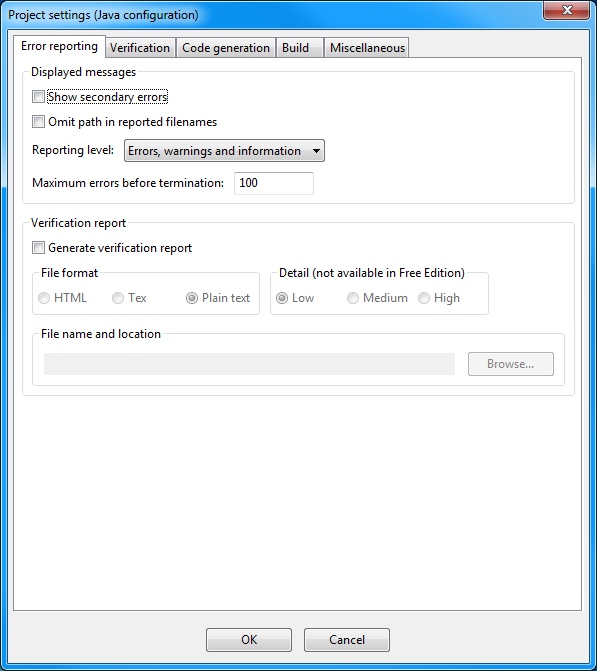
Checking the Show secondary errors box affects the treatment of errors that are likely to have been caused by other errors. Unless this box is checked, these secondary errors are suppressed, making it easier to concentrate on the others. We advise you to check this box only if a message is generated stating that errors were detected but all of them were suppressed.
Checking the Verification Report box enables the creation of a report summarizing what was and was not proved.
C/C++ compiler
This tab is only displayed if the current project is an Escher C Verifier project. It allows you to select the compiler and platform parameters that the verifier assumes.
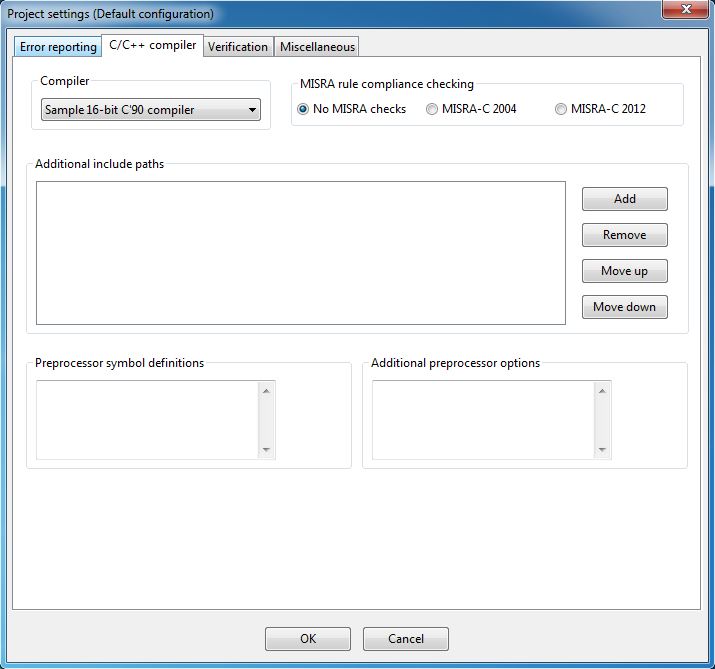
If you have not yet set the parameters for the compiler you wish to use, see section 3.9.
The Additional preprocessor settings field is only used if, in the global settings, you have chosen to use the compiler's own preprocessor for the selected compiler.
Verification
This tab always appears. It contains settings pertaining to the verification of the project.
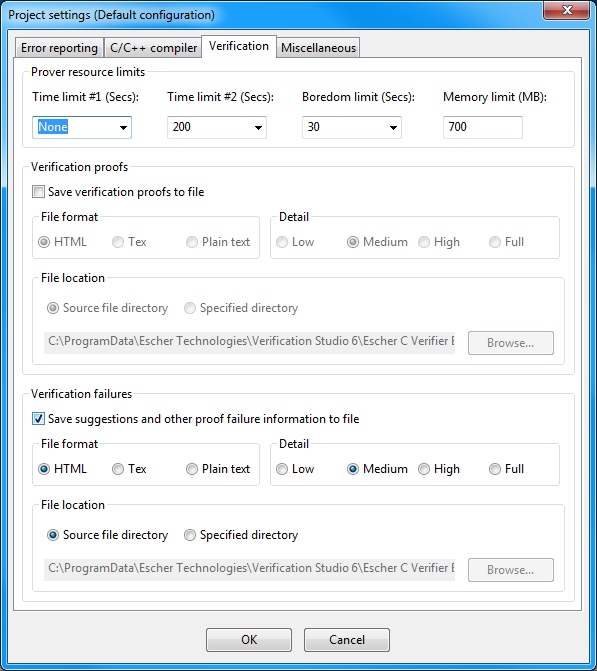
Time limit #1 should normally be left as None. Time limit #2 specifies the maximum amount of CPU time that is to be used in attempting to prove any one verification condition. However, if the amount of time spent on a single verification condition reaches the Boredom limit, and the prover considers that it has not made any progress so far, it will give up on that verification condition even if Time limit #2 has not been reached; otherwise it will reset the boredom timer and carry on.
Note that the prover runs more slowly and uses more memory when proof output is being generated. Therefore, we suggest you enable generation of proof output only when you need to preserve a record of the proofs. Enabling output for unproven verification conditions does not significantly affect performance.
See also the Verification Report option in the Error reporting settings.
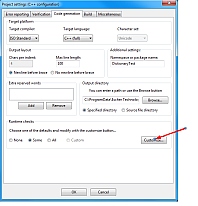
Code generation
This tab is only displayed when the current project is a Perfect Developer project. It contains settings pertaining to code generation, and includes settings for which runtime checks should be generated in the output code:
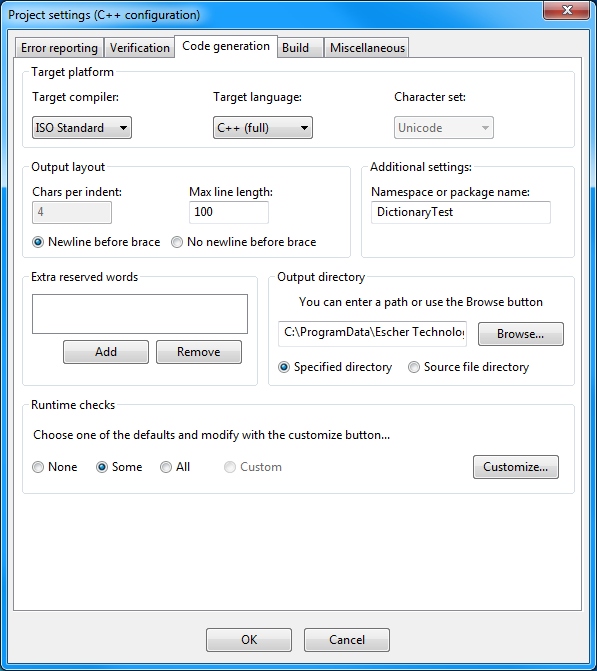
 Runtime checks include precondition checks, postcondition checks,
assertion checks, class invariant checks,
etc. You can set them up
by clicking the Customize button in the code
generation tab, which is indicated by the red arrow on the diagram to the right:
Runtime checks include precondition checks, postcondition checks,
assertion checks, class invariant checks,
etc. You can set them up
by clicking the Customize button in the code
generation tab, which is indicated by the red arrow on the diagram to the right: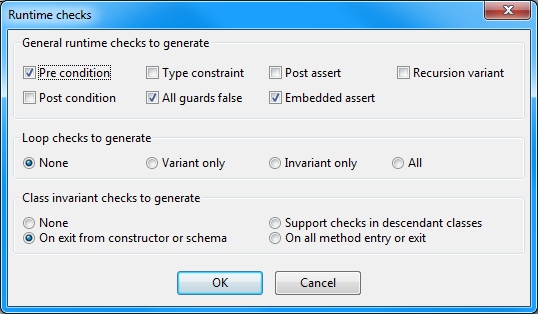
Build
This tab is only displayed when the current project is a Perfect Developer project. It allows you to specify operations that should be performed before and after generating code from the Perfect source files. For example, a compiler for the generated code may be invoked as a post-build step. The tab is shown below:
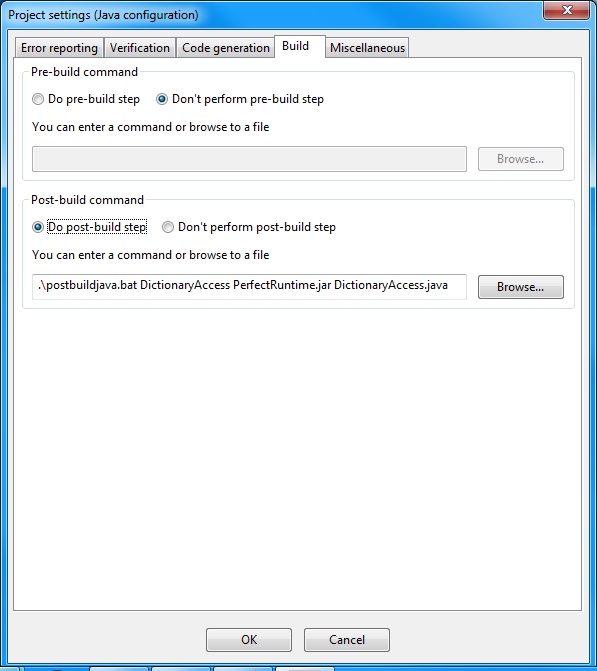
Prior to executing pre- and post-build commands, Escher Verification Studio sets up the following environment variables:
PD_CPP_INCLUDE_PATH The path to the directory in which the C++ header files describing the Perfect Developer run-time library were installed PD_CPP_LIB_PATH The path to the directory in which the Perfect Developer C++ run-time library files were installed PD_JAVA_LIB_PATH The path to the directory in which the Perfect Developer Java run-time library files were installed PD_JDK_BIN_PATH The path that you have indicated contains Java tools (see Changing Perfect Developer global settings) PD_PACKAGE The Java package name as configured on the Code generation tab
Miscellaneous
This tab contains various settings and is shown below:
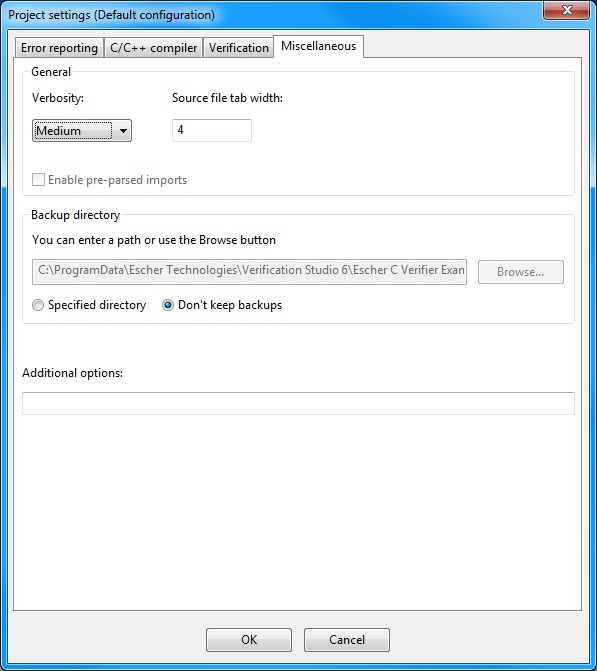
The Quiet level option selects the extent to which messages are displayed in the Results pane indicating the progress of the tool. Regardless of this setting, when verification is occurring the progress of the verifier is shown on the status line of the Project Manager.
The Source file tab width setting is used to calculate column numbers when generating diagnostic messages. This should be set to the same value that your editor assumes for the source files in your project.
The Additional options box is for any additional options you wish to pass to the verifier, for example -mb (benchmarking mode) or -mg (set LaTeX page geometry). See Chapter 6 for a description of command line options.
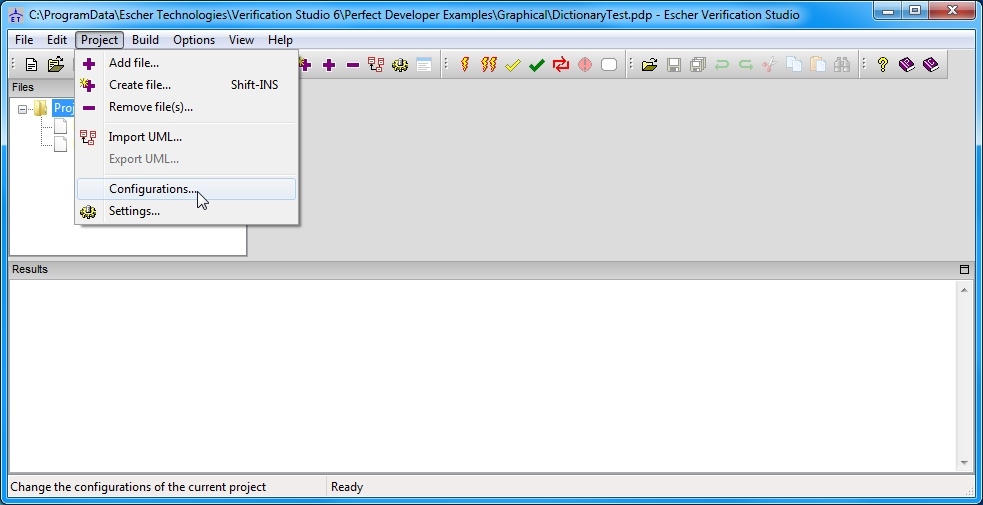
3.5 Using multiple configurations
The Project Manager allows for multiple configurations of a project to be defined. Each configuration has its own settings. The configuration manager is accessed via the Configurations item on the Project menu as follows:
This opens the configuration manager:
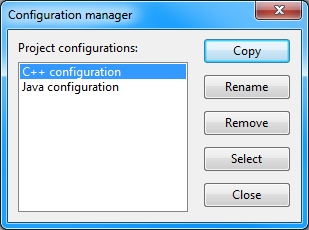
From the configuration manager, the following operations can be performed:
Copy
This copies the currently-highlighted configuration, prompting you for a name for the new configuration. Then you can choose Select to define the settings for the new configuration.
Rename
This prompts you for a new name for the selected configuration.
Remove
If more than one configuration is present, this operation is available in order to remove the currently-highlighted configuration.
Select
This selects the currently-highlighted configuration as the active configuration for subsequent operations.
Close
This closes the configuration manager.
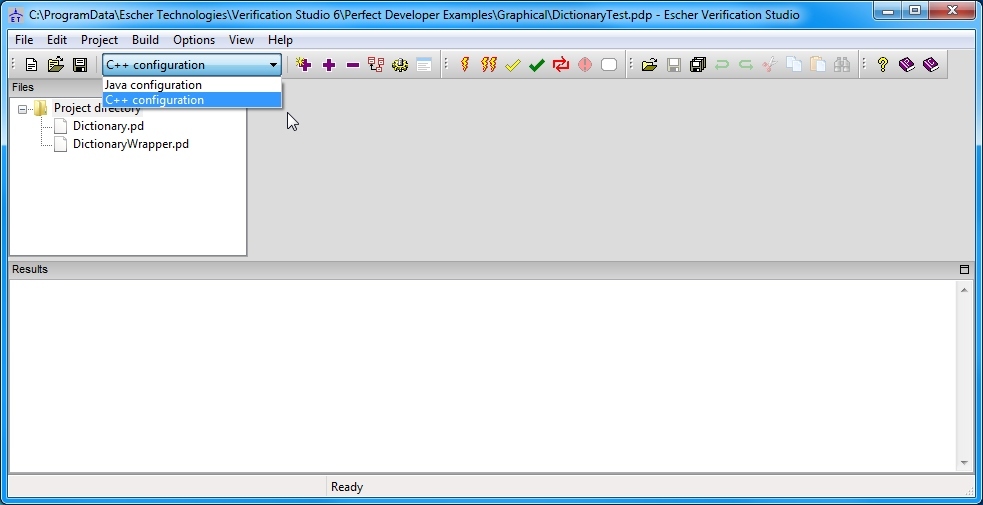
The currently-active configuration is shown below the menu bar in the Project Manager main window. Clicking on this allows you to select a new active configuration.
3.6 Building and verifying a project
The Build menu is shown below, and contains all the options for checking, verifying and generating code for the current project:
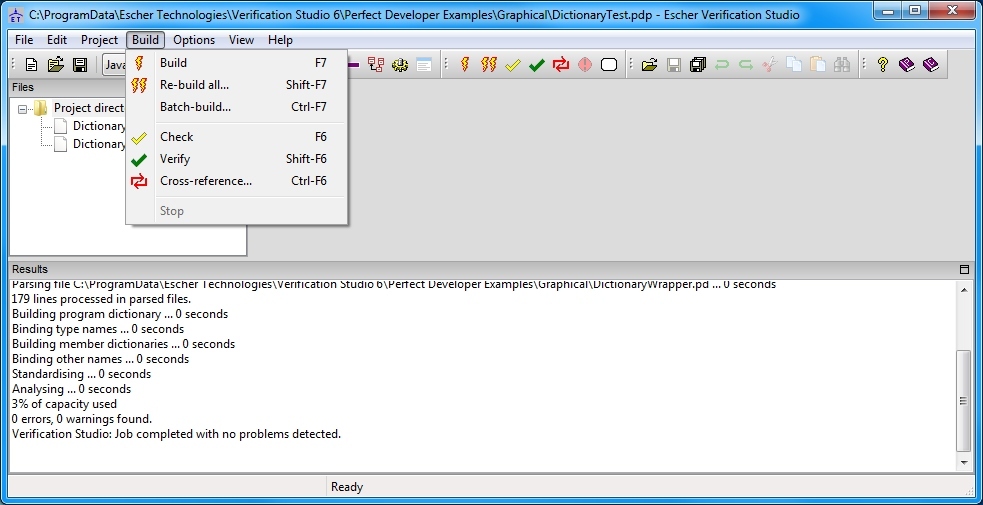
These items perform the following actions when chosen:
Build
This command is available only when the current project is a Perfect Developer project. It causes any files in the project which are determined to have been changed since the last build to be rebuilt (i.e. for code to be generated in the language specified in the Code generation tab of the project settings).
Re-build all...
This command is available only when the current project is a Perfect Developer project. It builds all files in the project, regardless of whether they have been changed or not. This is useful, for example, if a change has been made to the project settings which affects code generation.
Batch-build...
This command is available only when the current project is a Perfect Developer project. It allows the project to be built using several different configurations without any further user intervention. See section 3.5 for information on setting up multiple configurations.
Check
This performs syntax checking, type checking and basic static analysis on all the files in the project. This can be used to check quickly for simple errors, or to see whether a change to one file in the project has consequences for other files.
Verify
This performs the same actions as a Check and then attempts to verify all the files in the project using the options set in the Verification tab of the project settings. Progress is displayed on the status line during verification.
Cross-reference...
This generates a text file listing all declarations in the current project and the locations at which they are referenced. The dialog displayed after choosing this option offers the choice of listing just those declarations that are not referenced within the current project, and the option to open the listing file in the editor when the cross-reference is complete.
3.7 Error and warning messages
After performing a build, verify, check or cross-reference, an alert box will appear.
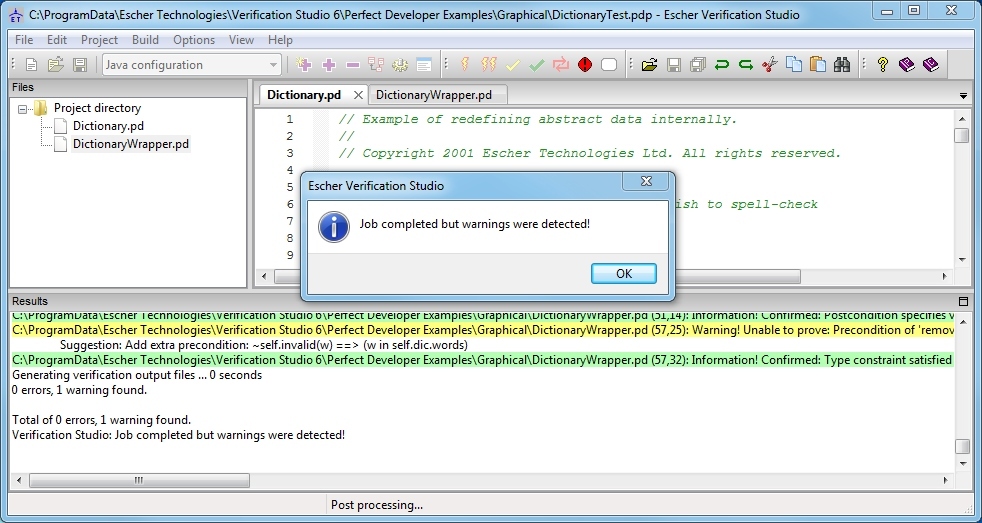
Having acknowledged the message in the alert box, the Results pane can be examined more closely. Suggestions, errors, warnings and information messages may appear.
Suggestions
In this illustration, there is a yellow warning message in the results pane. Sometimes the tool is able to offer you suggestions concerning possible improvements. As you can see, we do indeed have a suggestion from the tool in this case, about adding an extra precondition.
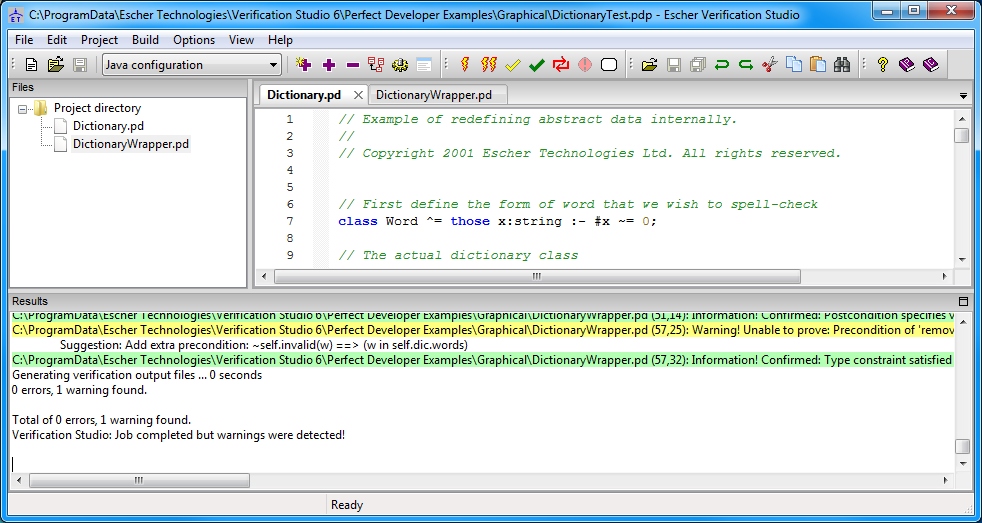
Inspecting the source of the problem
Double-clicking on a message will open the file for which the message was produced in the editor, at the relevant line and column (if the editor supports this - see section 3.8 for information on configuring the editor).
Right-clicking on the yellow message changes it to blue, and produces a dropdown menu as shown below:
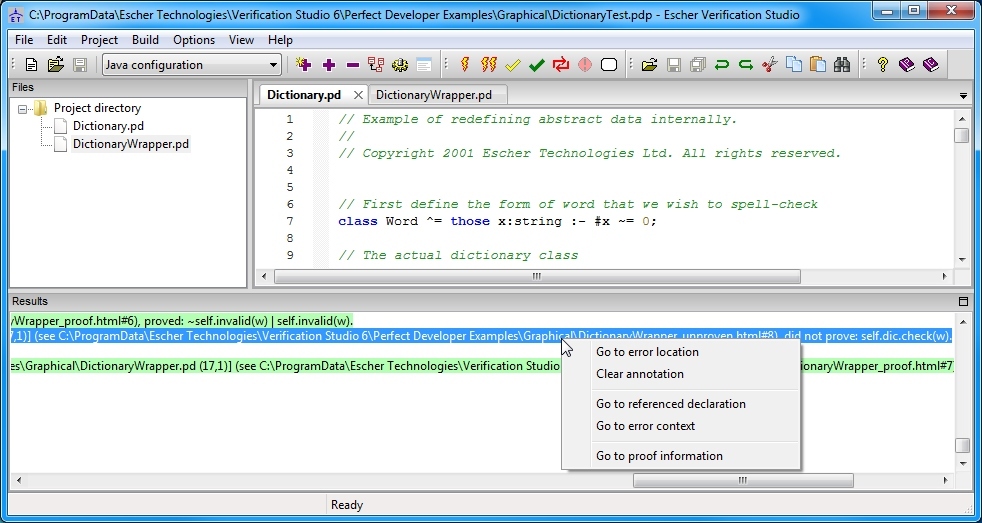
Depending on the error message, some of the options may be unavailable. The options have the following meanings:
Go to error location
This performs the same action as double-clicking, and opens the editor at the location of the error.
Clear annotation
This option is only available if annotations actually exist. An annotation, in this context, is an addition to your source code placed there by the tool to try to help you, when you go to the location of an error.
Go to referenced declaration
This will open the editor at the location of a declaration that is relevant to the source of the error. For example, it may be the location of the declaration of a precondition that cannot be proved to be satisfied.
Go to error context
This option is available when a method defined in a class has failed to be verified in the context of one of its descendants. In this case it opens the editor at the declaration of the class in which the method is being verified.
Go to proof information
This option is available when the verifier has produced proof or unproven output which contains information about why the verification condition could not be proved, provided that a viewer can be found that is appropriate to the chosen output format (e.g. a browser when the format is HTML). Selecting the item will cause the relevant proof or unproven file to be opened at the appropriate location.
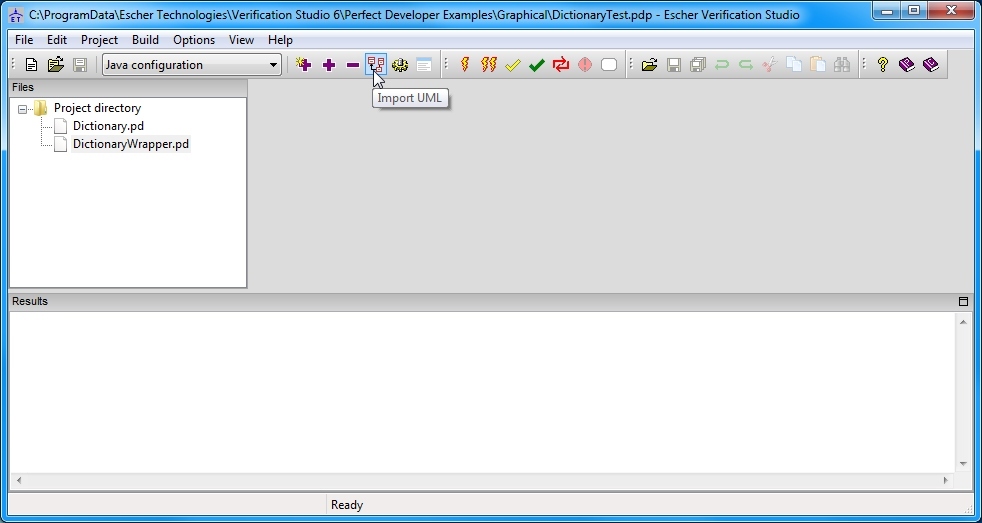
3.8 Importing UML class diagrams
Perfect Developer contains the facility to generate class skeletons from a UML diagram described in XMI format. This is performed by selecting Import UML... from the Project menu, or by clicking on the button on the toolbar:
You will then be asked to select an XMI file to import. If the selected file does indeed include a UML class diagram, the following dialog will be displayed:
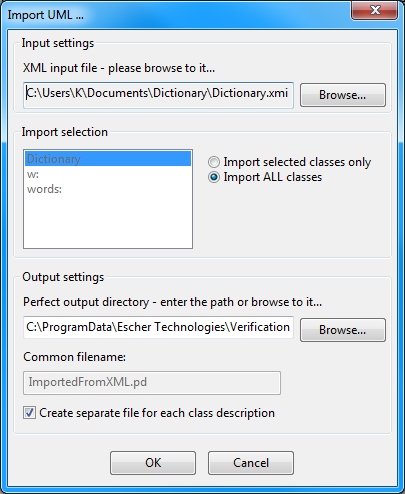
From this dialog you can choose which classes to import, which directory the generated Perfect files should be placed in, and whether to generate a separate file for each class (in which case the class name is used as the file name), or if all the classes should be placed in a single specified file.
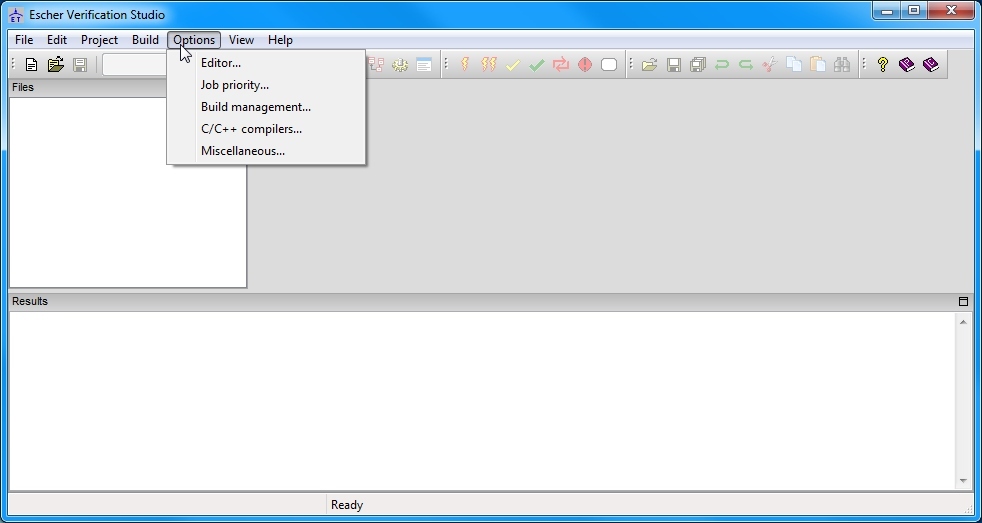
3.9 Changing Escher Verification Studio global settings
There are some global settings that are independent of any particular project. These settings are accessed through the Options menu:
Editor...
This item allows you to configure Escher Verification Studio to use either the built-in editor or your preferred editor when opening Perfect or C/C++ source files.
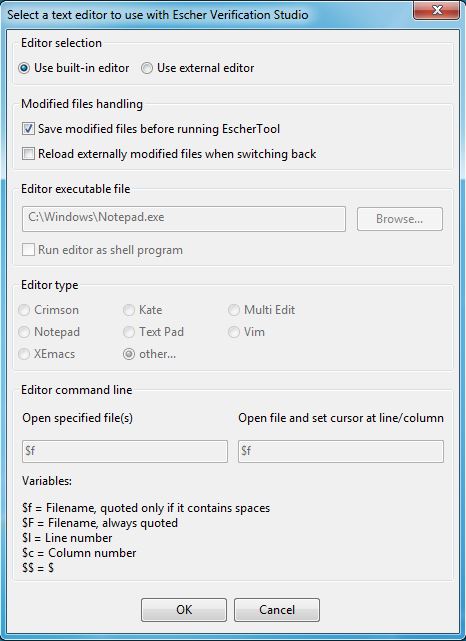
As well as setting the name of the executable file that starts your editor, you must select the editor type so that Escher Verification Studio knows how to pass it the correct command-line parameters. If your editor is not one of the types listed, select other. You will then need to enter the templates for the editor command line parameters.
The Open specified file(s) box allows you to define an editor command line tail that instructs the editor to open one or more files. Use the string '$f' is used as a place marker for the filename(s), or '$F' if double quotation marks should always be used around each filename.
The Open specified file and set cursor at line/column box allows you to define an editor command line tail that instructs the editor to open a single file and move the cursor to the specified position. As well as using '$f' or '$F' to stand for the filename, you can use '$l' to stand for the line number and '$c' to stand for the column number. If you find that the cursor seems to move to the wrong column, check that the tab character width configured in the editor for the type of your source files matches the Source file tab width configured in the Miscellaneous tab of the project settings, or try setting Source file tab width to one. If your editor does not support moving to a particular column at start up, just have it move to the correct line.
Job priority...
This item allows you to configure Escher Verification Studio to run chosen tasks at low priority, so that your machine remains responsive to other tasks. It is most useful when running on a computer with just a single CPU core The dialog is shown below:
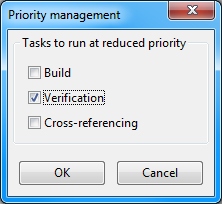
A checked box indicates that the associated task will be run at low priority.
Build management...
This item allows you to change the logic used by Escher Verification Studio when building a Perfect Developer project:
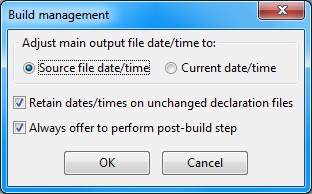
The first field of this dialog relates to the date stamp placed on the generated .cpp, .cs or .java code files, which affects which files will be included in a Build operation. If this is set to Source file date/time then Escher Verification Studio can detect when it needs to generate new code from Perfect source files even when the time stamp on the source files moves backwards in time (e.g. when regressing to an earlier version). Otherwise, new code will be generated only if the source file time stamp is later than the generated code file time stamp.
The first check box specifies whether Escher Verification Studio should retain the date/time on declaration files (the .hpp files, if the target language is C++) that are observed not to have changed following the building of a Perfect file. This prevents the external compiler used to compile the generated code from needlessly re-compiling source files that include that declaration file.
Checking the second box will mean that if you request a Build but there are no out-of-date files, you will be asked if the post-build step should be performed anyway. If the box is not checked, the post-build step will only be performed if some files have been rebuilt.
C/C++ compilers
This item is only available if your licence includes Escher C Verifier. This is where you configure the details of the compiler and platform that you will be using to compile your C or C++ source code. You will first be provided with a list of compiler configurations currently known to Verification Studio:
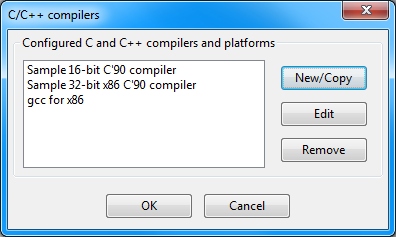
Pressing the New/Copy button will allow you to add a new compiler/platform combination to the list. If you click on an existing entry before pressing the button, the initial values for the new combination will be copied from the entry you selected; otherwise some default values will be used. Either way, you can amend the details of the new compiler and platform in the next dialog:
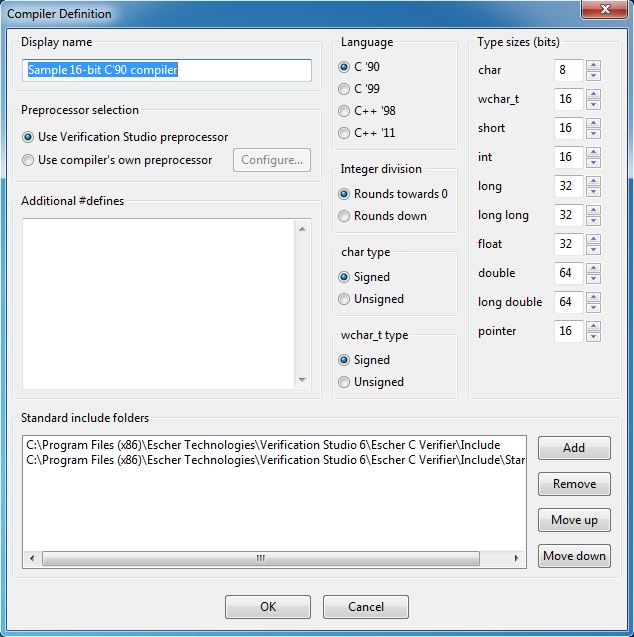
The Display name field defines the name of this compiler/platform combination as it appears in compiler selection dialogs. The Language, Integer division, char type and wchar_t type choices and the Type sizes values are used by the verifier. It is important that these values match the semantics implemented by your chosen C compiler for the target platform you are using, otherwise the verification results generated by eCv may not be valid for your target.
If you set Preprocessor selection to Use compiler's own preprocessor, then press the Configure button to open the following dialog, so that you can tell eCv how to run your compiler's preprocessor:
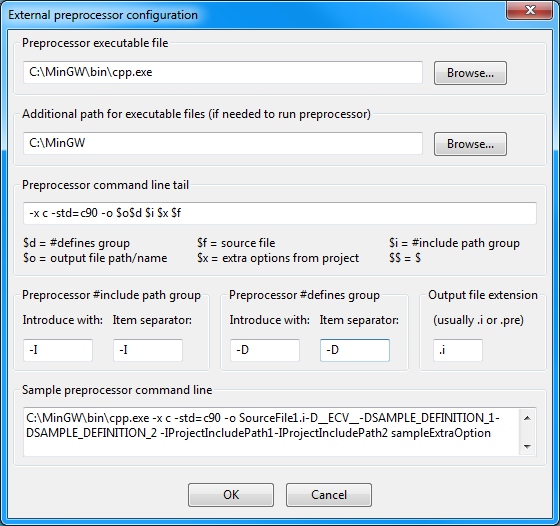
The Sample preprocessor command line field is populated automatically based on the values you enter in the other fields and in the Standard include folders field of the previous dialog.
Miscellaneous...
This item allows you to change other features of the operation of Escher Verification Studio:
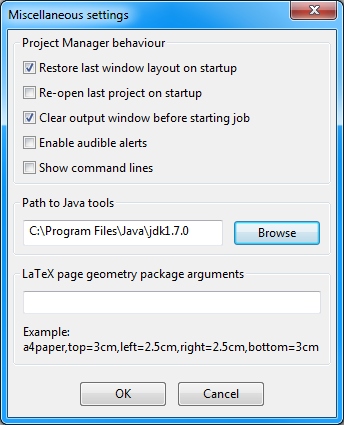
Checking Enable audible alerts causes a beep to be emitted at the end of every build.
The path to the Java tools is used only for setting up the environment variable PD_JDK_BIN_PATH prior to running pre- and post-build commands configured in Perfect Developer projects. Its value is of no consequence unless you are using pre- or post-build scripts that use this variable, such as the ones supplied with the examples.
The LaTeX page geometry settings are only used when generating files in Tex format for proof output, unproven information and the Verification Report. If present, the output file(s) will include a call to the LaTeX standard package geometry with the specified arguments, so that you can specify the page size and margins.
3.10 Choosing the report format
Escher Verification Studio provides a choice of output formats for the proof output, the unproven information, and the Verification Report. In each case you can select HTML, Tex or plain text format.
HTML format
This format is recommended when you intend to view the file(s) on-screen. It is suitable for the unproven information and the verification report, and for short proofs. If you select HTML format for the proof output, bear in mind that proofs can get very long, resulting in very large HTML files. This is especially so if you are running Escher C Verifier, and/or you have the proof output set to Detailed. Most browsers become unresponsive to a greater or lesser degree when asked to display large HTML files.
A benefit of using HTML format for proof and unproven output is that after a verification run, you can right-click on a verification error, warning or information message and select Go to proof information. This will open the proof or unproven information file at the bookmark corresponding to that message.
When choosing the filename for the Verification Report, if you have selected HTML format then you should use a file extension of .html or .htm. This will ensure that your default browser is used when you open the report within Escher Verification Studio.
Tex format
This format is recommended when you wish to generate printable reports, or to archive the file(s) for later viewing or printing. It is suitable even for large verification proofs.
When Tex format is chosen, Escher Verification Studio generates the corresponding file(s) in Tex format surrounded by a minimal LaTeX skeleton. This allows you to use any standard LaTeX processor to typeset the files. For example, if you are running Escher Verification Studio under Windows and you wish to generate reports in PDF format, then you can use the program pdflatex from the popular (and free) MikTex application.
When choosing the filename for the Verification Report, if you have selected Tex format then you should use a file extension of .tex or .ltx. This will ensure that an appropriate program is used (e.g. TexWorks, installed as part of MikTex 2.9) when you open the report within Escher Verification Studio.
Plain text format
This format is provided only for reading by other programs that cannot process HTML or Tex files.
4. Building a console application with Perfect Developer
Note: this section is only relevant to users of Perfect Developer. Skip it if you are using Escher C Verifier only.
4.1 Main program
To build a console-mode application, the program must define a main schema with the following signature (if the target language is Java this schema must appear in a file called Main.pd):
schema main(env!: limited Environment, args: seq of string, ret!: out nat)
The environment parameter represents the outside world and is required for input/output. The argument list passed to the schema contains the program name and command line arguments (as for a C++ main program). The schema should set the return code ret within the postcondition.
Some sample Perfect source files may be found in the Examples directory (unless you installed under Windows and chose not to install the examples).
An example 'hello world' project is available in Examples\HelloWorld\Hello.pdp. It includes configurations to generate both C++ and Java code. Under Windows, the generated C++ can then be compiled using the Microsoft Visual C++ 2010 project file Examples\HelloWorld\HellowWorld.vcxproj. Under Linux, you can compile and run the generated C++ code using the Gcc compiler. The generated Java can be compiled using the Java 6 Development Kit from Sun Microsystems.
4.2 Compiling and linking the generated code
If generating C++, it is necessary to compile and link together all the .cpp files generated from the relevant Perfect source files, and link with the relevant runtime library file, which can be found in the directory described in the section on Library and run-time files (8.4). If using gcc under Linux this can be achieved by using the options '-L/opt/escher/verificationstudio6/perfectdeveloper/runtimelibrary/cpp' and '-lperfectruntime' for a release build, or '-lperfectruntimed' for a debug build. If using Microsoft Visual C++ 2010 under Windows, ensure that library 'PerfectRuntime.lib' for a release build, or 'PerfectRuntimeD.lib' for a debug build, is present in the list of libraries in the link 'input' settings, together with the path in which the library is located (typically C:\Program Files\Escher Technologies\Verification Studio 6\Perfect Developer\RuntimeLibrary\Cpp\).
If generating Java, the file Entry.java in Examples\HelloWorld must be compiled along with the generated files. See the document Creating a Java application using Perfect Developer and the Java Development Kit for more information.
4.3 Runtime checks
Ideally, the program will be completely verified by Perfect Developer and no debugging of the generated code will be necessary. However, options to generate runtime checks are provided in the Code generation tab of the Settings property sheet. Note that some runtime checks (especially loop invariant checks) may increase execution time substantially.
If a runtime check fails then the following action is taken:
- If the generated code was C++, a debug breakpoint instruction is executed, so that if the program is being run under a debugger, control will be transferred to the debugger.
- If the generated code is C++ but no debugger is active, an exception will be thrown. The default implementation of the C++ main function provided in the runtime library wil catch this exception and proceed to display the nature of the failed runtime check and the call stack before aborting the program.
- If the generated code was Java, a runtime error exception will be thrown. The version Entry.java supplied does not catch this exception; typically, the Java virtual machine will produce a stack trace before terminating the program.
All generated and runtime C++ files must be compiled in "debug mode" (i.e. without the NDEBUG macro defined) for this support to be enabled, and should be linked with the debug version of the runtime library (PerfectRuntimeD instead of PerfectRuntime).
5. Hints and Tips
- Perfect Developer projects involving a large number of interdependent files are best built by building all necessary files in a single command. Each file will only be parsed and bound once, saving time. However, if a single file has been heavily modified and is likely to contain parsing errors, it may be quicker to try building it by itself.
- When performing verification, the theorem prover may spend a great deal of time trying to prove a difficult verification condition (if the condition is in reality unprovable). Use the time limit and boredom limit settings to restrict the amount of effort spent on each verification condition.
- Some operating systems are not effective at balancing CPU time between multiple tasks (typically, one computation- and memory-intensive task will virtually monopolize the processor). When using the computer for concurrent verification and editing or other interactive tasks, either use a multiprocessor system, or change the Escher Verification Studio global options to run the verification task at low priority.
- Suggestions on how to track down the reasons for verification failures may be found in the tutorials on our web site.
6. Command line operation
6.1 General
All checking, verification, code generation and cross-reference tasks for both Perfect Developer and Escher C Verifier projects are carried out by the EscherTool program. As well as running this program from the Project Manager, you can also run it from the command line, or from a batch file or shell script, or from your editor if your editor is able to invoke external programs.
The command line tail following the command name EscherTool may comprise one or more items. Items beginning with "-" are parsed as command line options to control the operation of the compiler. All other items are treated as the names of source files to be processed.
Any command line item that contains embedded spaces must be enclosed in double quotation marks.
Each command line option overrides any other conflicting options earlier on the command line.
6.2 Environment variables
If the environment variable ESCHERTOOLOPTIONS is defined, items in the value of this variable are parsed before the command line tail is processed.
6.3 Form of command line options
Following the leading "-" character, a command line option comprises one, two or three characters, sometimes followed by an equals sign and a value. The equals sign is optional if the value is numeric.
Multiple options beginning with the same letter may be combined by factoring. The initial letter is followed by "(" and a comma-separated list of options (leaving out the initial "-" and the first letter) and finally closed by ")". For example, "-e(m=1000,a)" is equivalent to "-em=1000 -ea".
In all the descriptions that follow, # represents a digit or digit string and $ represents a character string.
6.4 Error reporting options
| -ea | Report all error messages (otherwise, errors that are believed to be caused by other errors are not reported) |
| -el=# | Set displayed error reporting level (1 = errors only, 2 = warnings and errors, 3 = information, warnings and errors; default 2) |
| Set maximum number of errors found before the compiler quits (default 100) | |
| Select MISRA version for C/C++ source code compliance checking (0 = none, 1 = MISRA-C 2004, 2 = MISRA-C 2012; default 0) | |
| -es | Display shortened filenames (i.e. without paths) in error messages |
6.5 Code generation options
These options are relevant to Perfect Developer projects only.
| -g | Enable code generation |
| -gd* | Enable generation of all run-time checks - equivalent to -gd(A=1,a=1,c=4,i=1,l=3,o=1,p=1,r=1,t=1) |
| Select generation of post assertion checks (0 = disabled, 1 = enabled; default 0) | |
| -gda=# | Select generation of embedded assertion checks (0 = disabled, 1 = enabled; default 0) |
| -gdc=# | Select generation of class invariant checks (0 = disabled, 1 = generate empty class invariant body for use by other files, 2 = generate full class invariant body but no checks, 3 = generate full body plus checks when returning from a constructor or modifying schema, 4 = generate full body and full checks; default 0) |
| -gdi=# | Select generation of checks for no guard true in conditional expression, conditional postcondition or "if…fi" statement (0 = disabled, 1 = enabled; default 0) |
| -gdl=# | Select generation of loop checks (0 = disabled, 1 = check variants, 2 = check invariants, 3 = check both; default 0) |
| -gdo=# | Select generation of postcondition checks (0 = disabled, 1 = enabled; default 0) |
| -gdp=# | Select generation of precondition checks (0 = disabled, 1 = enabled; default 0) |
| -gdr=# | Select generation of recursion variant checks (0 =disabled, 1 = enabled; default 0) |
| -gdt=# | Select generation of type constraint checks (0 = disabled, 1 = enabled; default 0) |
| -gi=# | Set indentation of nested blocks in generated code to # characters (default 4) |
| -gk=$ | Generate code in package (Java) or namespace (C++, C#) name $ |
| -gp=$ | Generate output file in path $, relative to the source file path (default is the path of the source file) |
| -gr=$ | Treat the string $ as a semicolon-separated list of reserved words in the target language (note that each use of this option adds words to the reserved word list, i.e. previous instances of this option are not overridden) |
| -gs=# | Generate output in layout style # (0 = newline before '{', 1 = Kernighan & Richie style; default 0) |
| -gv=$ | Generate code for target language compiler type $ ($ = "ISO", "Borland", "Gcc" or "Microsoft"; default "ISO") |
| -gw=# | Set maximum width of output lines to # (default 100) |
| -gx=# | Specify executable type (0 = generic, 1 = Win32 console; default 1) |
6.6 Source language options
| -lcs | C/C++ type char is signed |
| -lcu | C/C++ type char is unsigned |
| -ld=# | Specify C/C++ integer division mode (0 = rounds towards zero, 1 = rounds down) |
| -ll=$ | Specify source language ($ = "C90", "C99", "C++98", "C++11" or "Perfect"). Specify "Perfect" to run Perfect Developer.
Any other selection runs Escher C Verifier. Selecting "C90" means the language is ISO-C90 as amended by TC1 and TC2. You can also specify "C" (equivalent to "C90"), "C++", "C++1998" (both equivalent to "C++98"), or "C++2011" (equivalent to "C++11"). |
| -lsc=# | Specify number of bits in C/C++ type char |
| -lsd=# | Specify number of bits in C/C++ type double |
| -lsf=# | Specify number of bits in C/C++ type float |
| -lsg=# | Specify number of bits in C/C++ type long long int |
| -lsi=# | Specify number of bits in C/C++ type int |
| -lsl=# | Specify number of bits in C/C++ type long int |
| -lsp=# | Specify number of bits in C/C++ pointer types |
| -lss=# | Specify number of bits in C/C++ type short int |
| -lsw=# | Specify number of bits in C/C++ type wchar_T |
| -lsx=# | Specify number of bits in C/C++ type long double |
| -lws | C/C++ type wchar_t is signed |
| -lwu | C/C++ type wchar_t is unsigned |
6.7 Source file options
| -sb=$ | Read built in declarations from file $ (default is builtin.pdc or ecv.pdc in the directory from which EscherTool.exe is loaded) |
| -sc=$ | Add directory $ containing Compiler-supplied header files to the include file search path (eCv only) |
| -sd=$ | Add $ to the list of predefined macros (eCv only; $ must have the form "identifier=value" or "identifier"; the default value is 1) |
| -sp=$ | Add directory $ containing Project-specific header files to the include file search path (eCv only) |
| -sr=$ | Read rules from file $ (default is rubric.pd in the directory from which EscherTool.exe is loaded) |
| -st=# | Assume tab stops every # character positions when reporting the location of an error (default 4) |
6.8 Verification options
| -v | Enable verification |
| -vb=# | Set prover boredom limit (in seconds) per verification condition (0 = no limit; default 15) |
| -vl=# | Set verification method (0 = use rewriter only, 1 = use rewriter and prover; default 1) |
| -vm=# | Set maximum amount of memory (in MB) to be used for verification before stopping (0 = no limit; default 0) |
| -vp | Generate proof output files |
| Generate proof output files in directory $ | |
| Specify detail level for proof files (0 = abbreviated, 1 = full; default = 0) | |
| -vps=$ | Use style $ for proof output files ($ must be "text", "tex" or "html"; default "text") |
| -vrf=$ | Write a verification report to file $ |
| Specify detail level for the verification report (0 = low, 1 = medium, 2 = full; default = 0). The Free Edition supports level 0 only. | |
| -vrs=$ | Use style $ for verification report ($ must be "text", "tex" or "html"; default "text") |
| -vt=# | Set prover time limit (in seconds) per verification condition (0 = no limit; default 200) |
| -vu | Generate output files detailing unproven verification conditions |
| -vud=$ | Generate output files detailing unproven verification conditions in directory $ |
| -vul=# | Specify detail level for unproven file (0 = goals only, 1 = goals and relevant givens, 2 = goals and all givens, 3 = goals, all givens and initial givens; default = 1) |
| -vus=$ | Use style $ for details of unproven obligations ($ must be "text", "tex" or "html"; default "text") |
| -vw=# | Set rewriter time limit (in seconds) per verification condition (0 = no limit; default 0) |
6.9 Cross reference options
| -x | Enable cross-referencing |
| -xf=$ | Write cross-reference information to file $.xref (default is unnamed) |
| -xu=# | Generate a list of unreferenced declarations only (0 = disable, 1 = enable; default 0) |
6.10 Miscellaneous options
| -a | Display version information |
| -h | Display help text |
| -mb | Enable benchmarking mode |
| -mg=$ | When generating Tex files, invoke the LaTeX geometry package with argument $.
This allows you to set the page size and margins. Example: |
| -mp | Run at low task priority |
| -mt | Enable regression testing mode |
| -q=# | Set quietness of progress reporting (0 = verbose, 1 = concise, 2 = summary; default 1) |
| -z=# | Indicates that tool is being run from Verification Studio with interface version # (0 = not running from Verification Studio; default 0) |
| Read more options and filenames from the file $ | |
| -? | Display help text (same as -h) |
7. Return codes
The compiler terminates with one of the following return codes:
| 0 | No errors or warnings were reported |
| 1 | No errors were reported but one or more warnings were reported |
| 2 | One or more errors were reported |
| 3 or higher | A fatal or internal error was detected |
8. Verification Studio files
The paths given for the following files are relative to the directory into which Escher Verification Studio is installed. This is typically "C:/Program Files/Escher Technologies/Verification Studio 6" under Windows, or "/opt/escher/verificationstudio6" under Linux.
8.1 Verification Studio program files
File bin/EscherTool.exe under Windows, or bin/eschertool under Linux, holds the verification tool and the code generator for Perfect Developer. Files builtin.pdc, rubric.pdc and ecv.pdc in the same folder are used by EscherTool.
8.2 Library and run-time files for Perfect Developer
Runtime libraries are supplied for code generated by Perfect Developer for the C++, C# and Java languages.
8.2.1 C++
File Perfect Developer/Include/cpp/Ertsys.hpp under Windows, or perfectdeveloper/include/cpp/Ertsys.hpp under Linux, contains directives to include a number of other C++ header files from the same foler. The Perfect Developer code generator puts a directive to #include Ertsys.hpp in the generated C++ files.
The runtime library files for release and debug builds respectively are supplied in the files Perfect Developer/Runtime Library/cpp/PerfectRuntime.lib and Perfect Developer/Runtime Library/cpp/PerfectRuntimeD.lib under Windows, or perfectdeveloper/lib/cpp/perfectruntime.a and perfectdeveloper/lib/cpp/perfectruntime-debug.a under Linux. One of these files must be included in the linker library list.
8.2.2 Java
File Perfect Developer/Runtime Library/java/PerfectRuntime.jar under Windows, or perfectdeveloper/lib/java/PerfectRuntime.jar under Linux, contains the runtime classes required to build and run generated Java files. The alternative files Perfect Developer/Runtime Library/java/PerfectRuntimeD.jar (Windows) and perfectdeveloper/lib/java/PerfectRuntimeD.jar (Linux) perform run-time precondition checking within library methods.
If your program entry point is written in Perfect then you will need to compile the file Entry.java along with the generated Java files. The package name in Entry.java should be changed to match the package name specified when generating code in Perfect Developer.
8.2.3 C#
File Perfect Developer/Runtime Library/csharp/PerfectRuntime.dll under Windows, or perfectdeveloper/lib/csharp/PerfectRuntime.dll under Linux, contains the runtime classes required to build and run generated C# files.
If your program entry point is written in Perfect then you will need to compile the file Entry.cs along with the generated C# files. The namespace name in Entry.cs should be changed to match the namespace name specified when generating code in Perfect Developer.
8.3 Standard header files for Escher C Verifier
Folder Escher C Verifier/include under Windows, or ecv/include under Linux, contains file ecv.h which must be directly or indirectly included in all C source files processed by eCv. Subfolder standard of this folder contains a set of C'90/C'95 standard header files, which are intended to be used when you are using eCv's own preprocessor.
8.4 Examples
Folder Examples under Windows, or examples under Linux, contains subfolders which in turn contain example programs for Perfect Developer and Escher C Verifier.
8.5 Editor customizations
Folder Editor Customizations under Windows, or editorcustomizations under Linux, contains a number of subfolders, each named after an editing program. They contain customization data to help the editors concerned support syntax highlighting for Perfect source files, together with instructions in a readme file.
© 2017 Escher Technologies Limited. All rights reserved.
Java is a registered trademark of Oracle and/or its affiliates. Linux is a registered trademark of Linus Torvalds in the United States and other countries. MISRA and MISRA C are registered trademarks of MIRA Limited. Windows is a registered trademark of Microsoft in the United States and other countries. Other names may be trademarks of their respective holders.